| Home | Picture Pages | Links |
|
|
Updated 4-26-2004: Table FINISHED! | ||
|
|
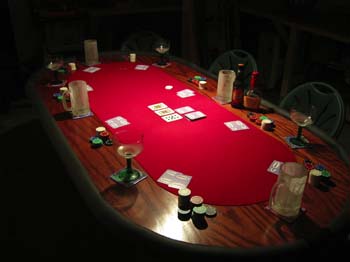
| In my quest to not buy some junky, over priced, foreign-made poker table for our bi-weekly home game, I decided to build my own. I first searched the Web for a little guidance, and like most others before me in this quest, I didn't find much. I finally stumbled across a poker forum called 2+2 which had some guys talking about home-built DIY tables. There were pictures and links to pages similar (and better) than this one that helped me out a GREAT deal. So in homage to those folks, I decided to put up this simple page with my experiences. I got started late in the game and didn't get many pictures on the early stages of construction. Hopefully this page and the links I've provided will help others in their quest to build a poker table they can be proud of! 4-17-2004, Saturday Using the many web sources on my Links page, the discussions on the 2+2 Forum, and the inspiration from Greg Sorensen's table, I decided on a simple oval table that comfortably seats 8 and is 7'x3.5' with exposed wood around the outer edge for chips and drinks. I wanted the exposed wood to look really expensive, so I splurged on some $20 1/4" oak plywood. I headed down to Lowe's and had them cut a 4x8 sheet of particle board and a 4x8 oak plywood sheet to 7'x3.5'. I clamped these together and marked each end 21" (half of 3.5') from the edge and top. Using a pushpin and some string and pencil I drew a nice arc on each end. I cut this with a fine blade jig saw. I shortened the string 9" and traced the "insert" arc. This center section "insert" was also cut with a fine tooth jig saw 9" in from the edge. This "insert" will then have 1/4" foam glued to it and then be covered in cloth. It will then be bolted back onto the main table for a really nice look. To accomplish this, I used six (maybe more) 10-24 tee-nuts countersunk into the insert with a forstner bit and 10-24 bolts with washers will hold it down screwed in from under the table. The pictures really show this better than I can explain it. As I said, the main table is cheap 5/8" particle board with the outer exposed oak plywood glued to it with Gorilla Glue. I used the cheaper particle board because it will have lots of support from the old folding table. If I were just going to buy some folding legs like other folks have done, I would have gotten some good quality 3/4" plywood to attach them to. I centered the oak/particle sandwich on the old folding table and attached 4 small scrap plywood pieces on each side to keep the poker table centered when placed on the folding table. I also attached some cheap latches to hold it all together. I've applied two coats of cherry gel stain to the oak and just put on a coat of semi-gloss polyurethane Sunday night. I'll update this page as things progress. I still have to purchase foam and cloth and then attach the pipe insulation arm rest ring around the outside with contact cement. Check out the Picture Pages to see how things are coming along. 4-20-2004, Tuesday 4-21-2004, Wednesday 4-22-2004, Thursday 4-23-2004, Friday 4-25-2004, Sunday On to the insert. Since I'm not using any foam padding I put some small pieces of duct tape over the t-nuts. Also wrapped the edge of the plywood in duct tape. This does two things. First, it protects the cloth from getting snagged in the next step. Second, it adds a little thickness to the insert so it will fit snug on the table. I only needed one layer. Thanks to Greg for this tip as he has a gap in his table and thought this may help me. Next I cut the cloth in half which gives me about 2"-3" overlap on all sides. Laid this on the main table and centered it up. Then placed the insert upside down on top of the cloth. I started by stapling about every inch down one of the long sides with 1/4" staples. Went to the other long side and pulled tight and stapled down it. Moved on to the arcs with same procedure. I had a loose spot on one of the long sides so I removed all the staples on that side and pulled it even tighter. I cut the excess fabric from the arcs so the cloth wouldn't bunch up. It looks great, better than expected. I Scotch Guarded the cloth and the insert was then bolted to the table. On to the padded rail, the last step! I lucked out and only needed 3 each of the pipe insulation sections. I laid out the small gray foam around the table and cut one to size, I removed one section and painted the contact cement gel to to the side of the table. Then painted the inside of the foam. Waited 15 minutes and then stuck the two together. Did this to the other two pieces. The fumes from the contact cement are strong and explosive, so ventilate well! I then laid out the larger diameter black foam rubber insulation on top of the gray and trimmed to size. Painted the gray foam with contact cement and the inside of the black foam. Waited 15 minutes and stuck them together. The foam I bought was already split down the middle and had adhesive on the edges. I pealed off the tape and used this adhesive to stick the foam to the table top. This whole process was the most difficult of the entire project. Once the tacky contact cement touches itself it's almost permanent. This made positioning the black foam very difficult and I tore it in a few spots. In the future I think this will get replaced with the prefab rail made by Casino Supply. Well, that's it. The table is done! This really only took a week of spare time and it looks great. I still need to bolt some chain to a roof joice in the garage so I can hang the table top out of the way. I also may add some sort of fabric table skirt so the cheap looking folding legs don't show as bad, but other than that it's ready for some poker. So far my only complaint is the table sits to high. The only way to shorten it will be to cut the metal legs down. I'll ask the gang their opinions this Friday. Again, take a look at the photo pages for clarification. Don't hesitate to email me with questions or comments. |
|
||||||
| ©2005Chris Norrick | Home • Picture Pages • Links |